

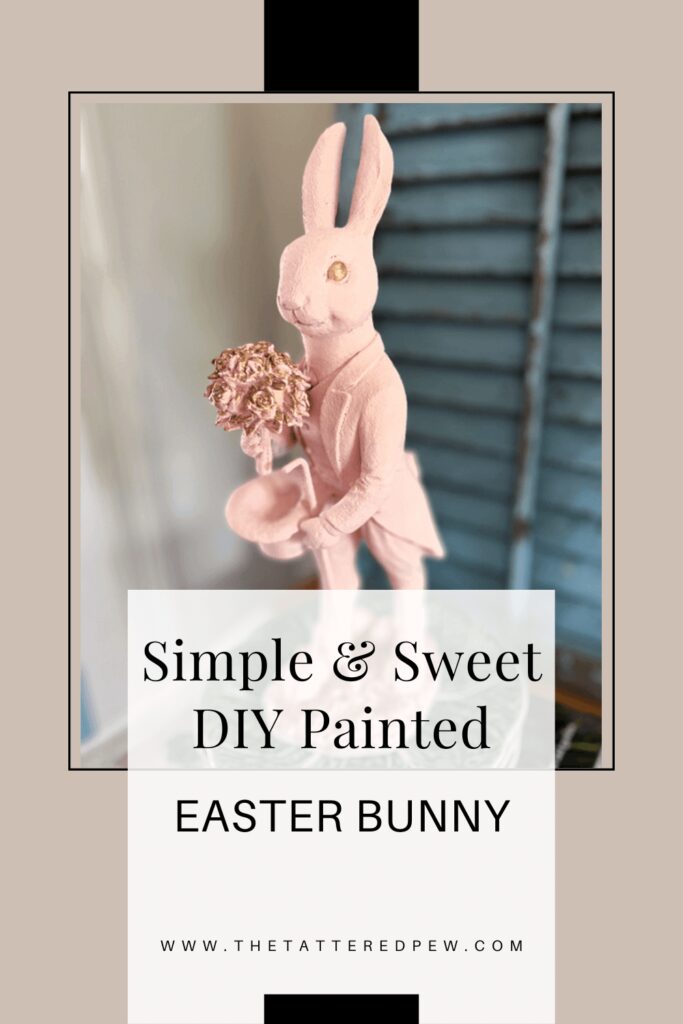
Simple and Sweet DIY Painted Easter Bunny
Easter is right around the corner and what better way to get in the spirit of the season than with decorations. If you’re looking for a simple, easy, and budget-friendly DIY project that will bring your home to life this season then look no further! In this post, I’ll show you how to make a painted Easter bunny decoration using just paint and an old Easter figurine. It’s quick, it’s cute, and it’ll make your home feel special!
*As an Amazon Associate, I earn from qualifying purchases. This post contains other affiliate links too for your convenience. Click here to read my full disclosure policy.
The Cozy Creative Collaborative
Friends I am so excited to share with you that I am joining some amazing fellow bloggers for a new monthly blog series and we are calling it the Cozy Creative Collaborative! Let me introduce you to the ladies.

Each month we will bring you a fun new DIY themed for the season or whatever seems to be inspiring us.
This month we are featuring Easter DIY projects and I know you will love them all!
If you are popping over from Charity of Mornings on Macedonia and her Dollar Tree Egg Wreath, welcome! Wasn’t it just the cutest?
Now, I can’t wait to show you my painted Easter bunny!
Simple and Sweet DIY Painted Easter Bunny
I have to be honest, I’m not huge on using bunnies in my Easter decor usually. For us Easter is all about celebrating the death and resurrection of Jesus. But this year I figured I could do both and wanted to give a painted Easter bunny a try.
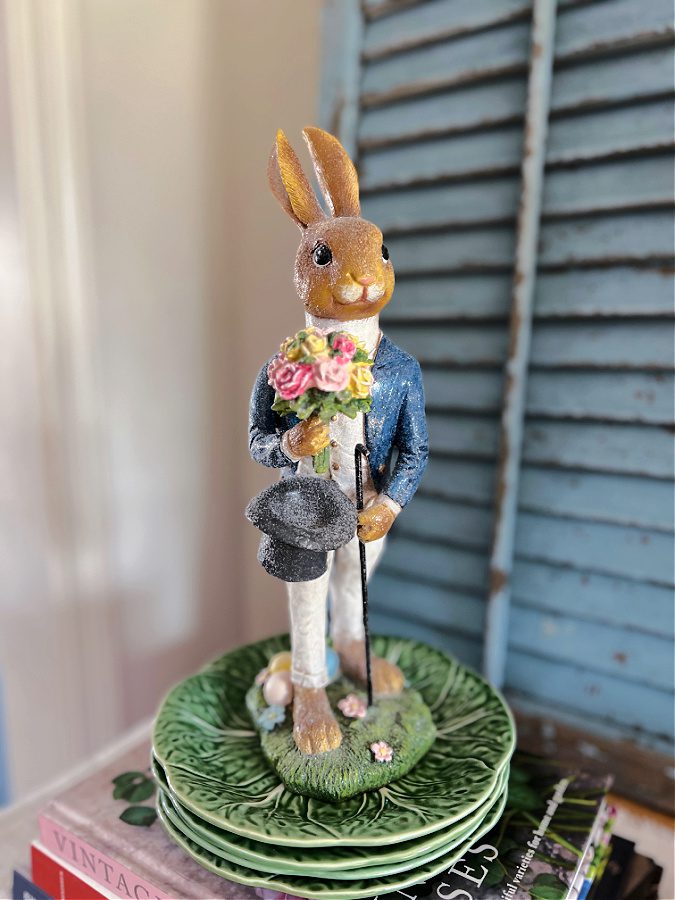
Last year I won this glittery bunny figurine at a Spring open house for a local shop in our town. I tossed it in one of my many drawers where I stash “my stuff” in the hopes I might use it one day. It is a cute Easter bunny but not really my style.
Well that one day came just a year later and I have to say, I am loving how it turned out. Let’s get down to the details of this simple and sweet DIY painted Easter bunny! Because boy oh boy did he sure transform into one cute Easter bunny!
Gather Your Supplies
Before you can begin crafting your painted Easter bunny decoration, you’ll need to gather your supplies.
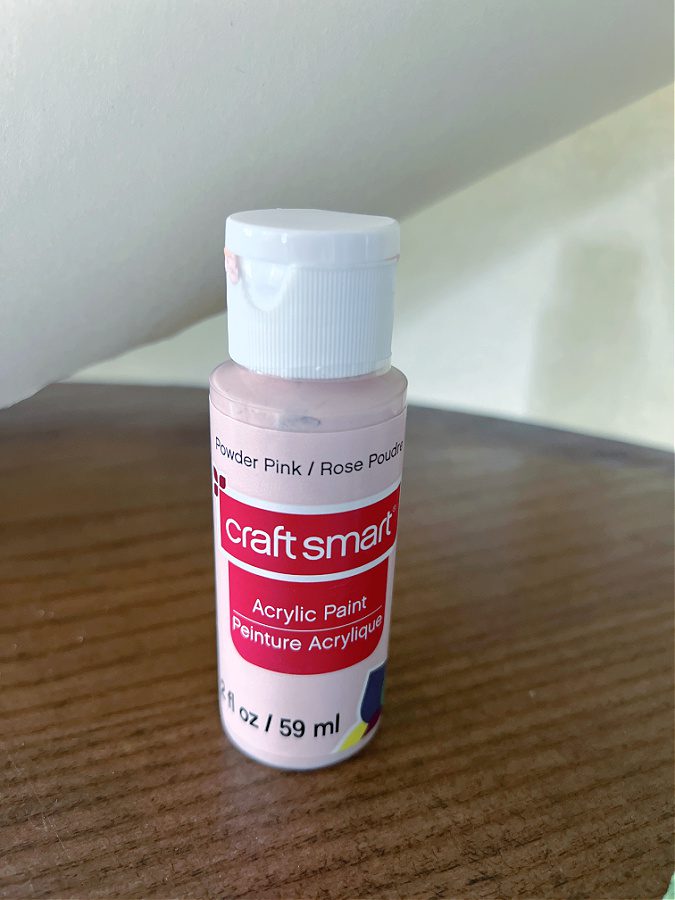
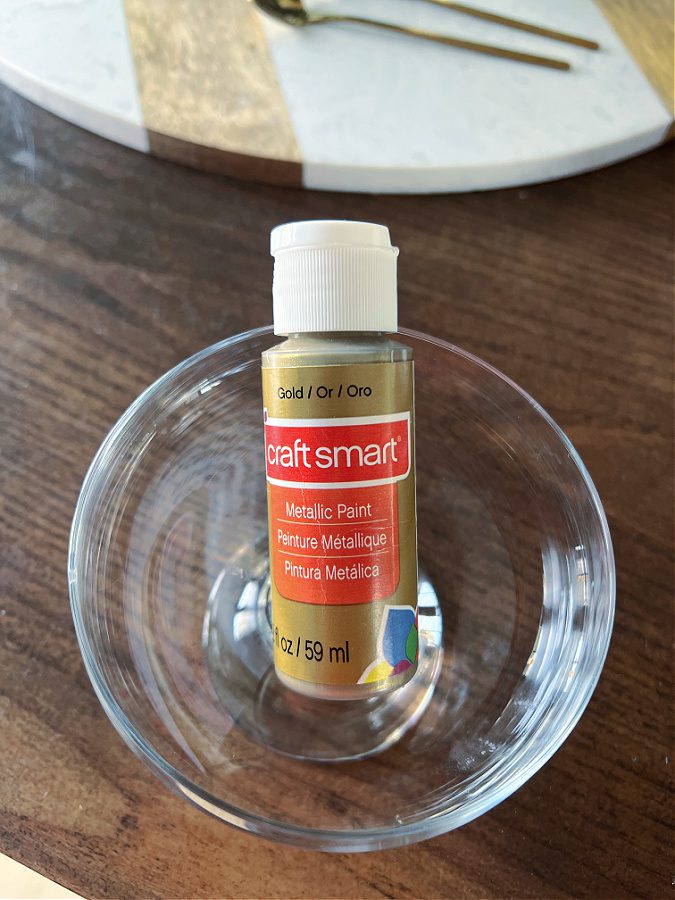
You’ll need an old Easter bunny figurine (or any other type of figurine if you don’t have an Easter one), some paint (I went with pink and gold but feel free to use any color combinations you like), a few brushes (one thin brush for detail work and one thicker brush for larger areas) and some craft paper, newspaper or drop cloths to protect your work surface from spills.

Once you have all these items gathered together in one place, you are ready to begin crafting.
And friend, this painted Easter bunny takes no more than 10 minutes including dry time! Now that’s my kind of DIY.
Supplies Needed
- Old or thrifted figurine (this way if you don’t like the end result you can recycle it!)
- Acrylic Paint ( I used pink and gold)
- thin brush for details
- thicker brush for full coverage
- paper to protect surface from paint
Painting Your Figurine
The first step is painting your figurine.
Start by laying out some craft paper or drop cloths on the table or floor where you plan to paint so that any spills are contained.
Then take your figurine and give it a good wipe down with a damp cloth so that there is no dust or dirt on it when painting.
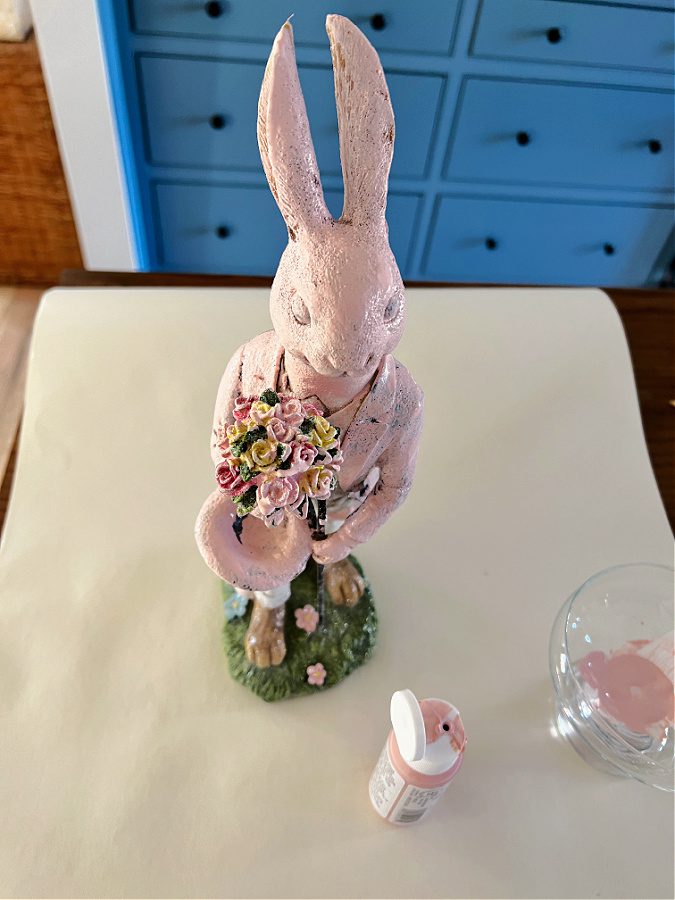
Then just start painting! Your Easter bunny just needs full coverage of paint so don’t stress about painting it to perfection.
I chose pink for the base color but feel free to choose whatever color suits your fancy.
Be sure to cover every inch of the figurine with paint before allowing it to dry completely.
Once dry, decide if it needs another coat of paint. I did two full coats of paint on my bunny and it was perfect coverage. I even thought about leaving it all just this darling pale pink but then it felt like it needed something more.
Finishing Touches
So my mom suggested I add gold touches here and there and she was right!
For some depth and detail use another thin brush dipped in gold paint to create decorative details on the figure- get creative! I added touches of gold to the flowers, his eyes and the base.
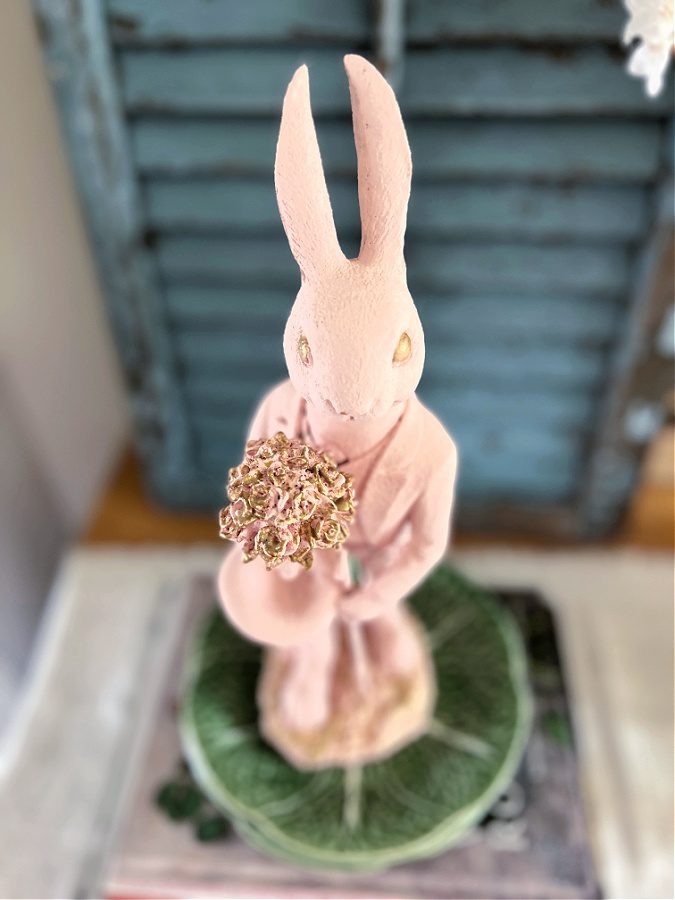
Again, be creative here – there are no wrong answers when it comes to decorating this little cutie!
Finally, let the entire figurine dry completely before moving onto the next step.
Styling Your Painted & Cute Easter Bunny
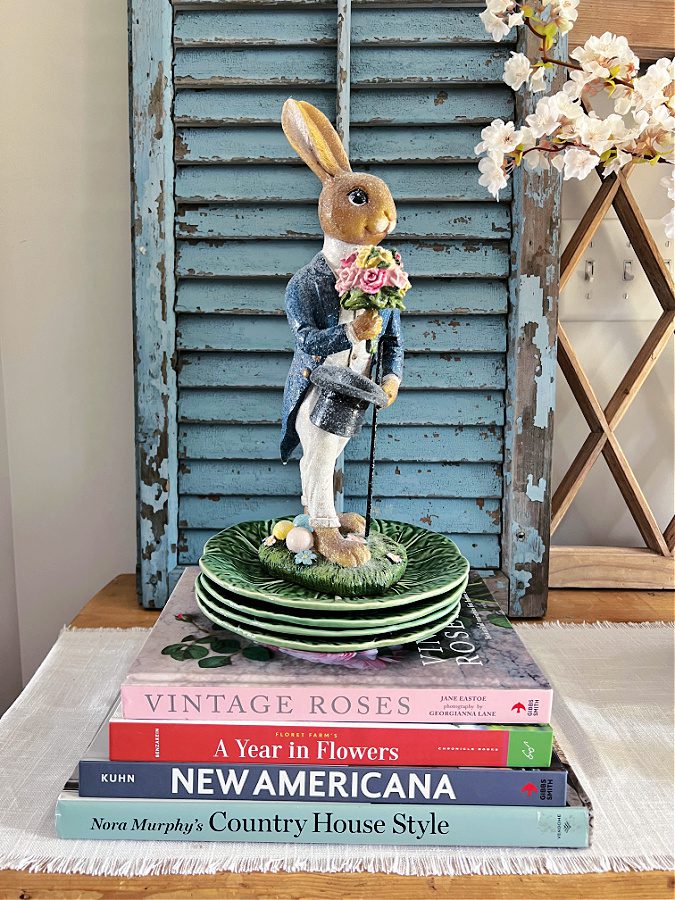
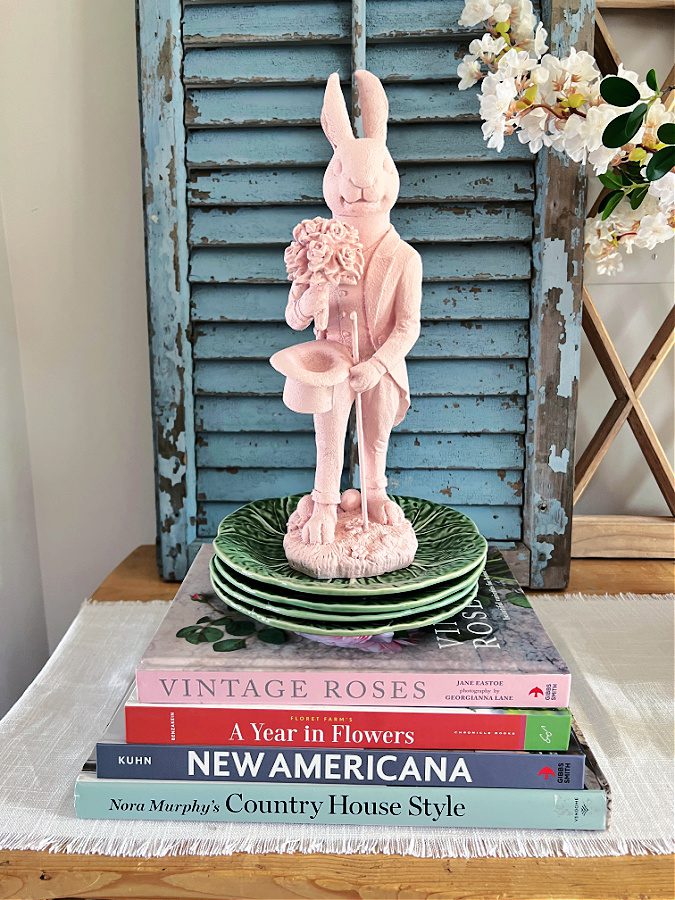
Once everything has dried completely, go ahead and place cute Easter bunny somewhere special in honor of this wonderful season of renewal!
I added him on top of this fun stack of green cabbage plates and home decor books.
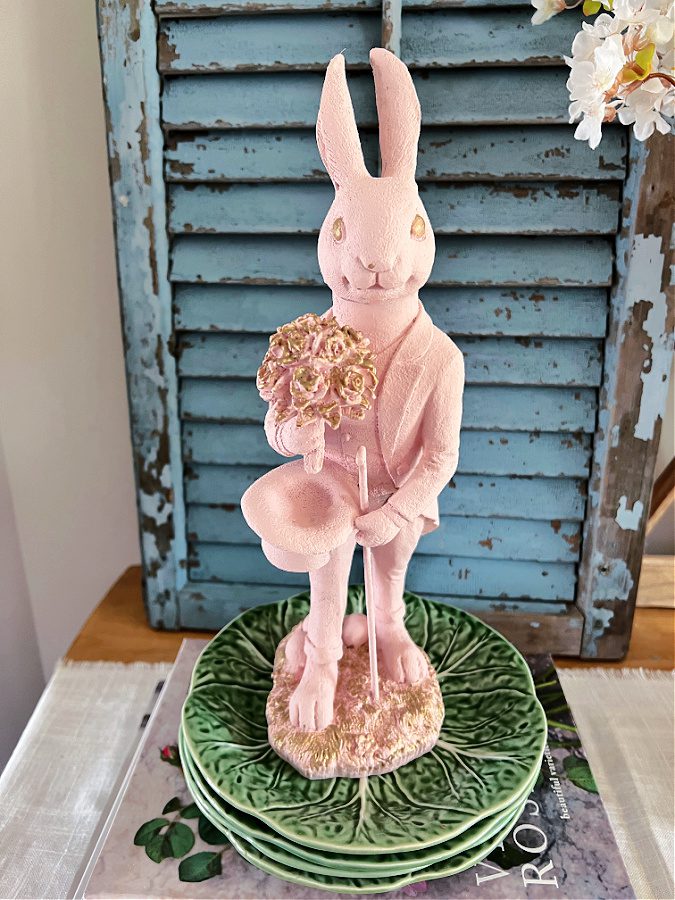
I just love how the pale pink pops and adds a fun accent to this space in our home. And now, I just might be in to adding more cute Easter bunnies around our home if they all turn out this pretty. Plus, since this project only took 10 minutes I think I could swing a few more.
My mind is spinning and I’m thinking a tone of these painted bunnies in all shapes and sizes lined up as a centerpiece on a table would be so much fun!!!

Simple and Sweet DIY Painted Easter Bunny
Everyone loves decorations during holidays like Easter; they help us celebrate while also bringing life into our homes. That’s why I put together this fun DIY project so that anyone can make your own unique painted Easter bunny decoration at home with just a few basic supplies like paintbrushes & paints!
I hope that this post has inspired you try out something new! Now make sure to head over to Nicolle of Our Tiny Nest’s Easter basket with faux carrots!
I’d love to have you hang out with me some more! Feel free to follow along with me on any of the platforms linked below.
LTK | Facebook | Instagram | Pinterest | Amazon
Kelly your little bunny came out so beautiful! It’s amazing what a little paint can do! I’m so excited to be doing this series with you my friend <3
Thank you Nicolle! Yes paint is simply amazing and so excited for this group!
Kelly,
I love the updated rabbit. Great job.
Thank you, Rachel!
I’m with you, a series of these bunnies gathered on a table would be fun!
It might take a bit more paint though! Ha!
What a fun collab!! Your bunny looks so cute.
Yes I am so excited, thanks Kim!
This bunny is just adorable Kelly! What a great transformation! I ‘m so excited to be a part of this group with you, looking forward to all the inspiration this group has to offer!
Thanks Heidi and me too!
This post made me think of my grandson Leo he lovevs bunnies
This post made me think of my grandson Leo he lovevs bunnies
So sweet! I bet he loves Easter time then!
I love this painted bunny. Such a cute idea and it turned out so good!
Thanks Charity!
Super cute! I love him.
Thank you Renae!
He turned out adorably, Kelly!
Thanks, Jen!