

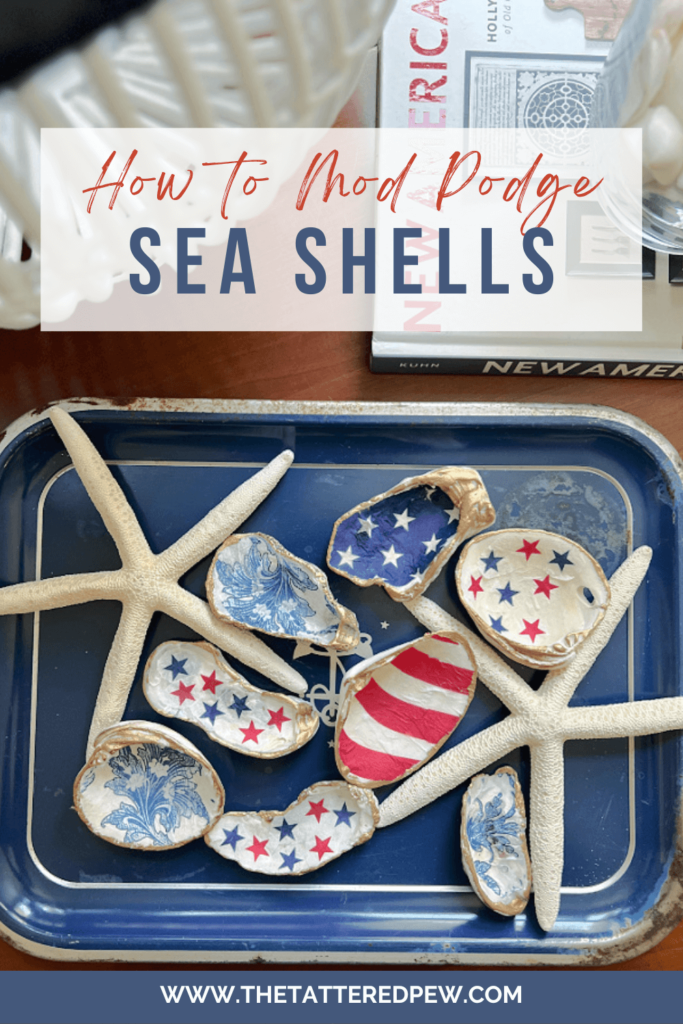
How to Mod Podge Sea Shells for Decor
Hey there, craft enthusiasts! It’s Kelly from The Tattered Pew, and today I’m thrilled to share a fun and patriotic mod podge project with you. We’ll be turning ordinary sea shells into stunning decor pieces that will add a touch of charm to your home. Get ready to dive into how to mod podge sea shells for decor with a patriotic twist!
*As an Amazon Associate, I earn from qualifying purchases. This post contains other affiliate links too for your convenience. Click here to read my full disclosure policy.
The Cozy Creative Collaborative
Friends I am so excited to be joining some amazing fellow bloggers for our monthly blog series that are calling it the Cozy Creative Collaborative! This month our theme is anything patriotic!
Let me introduce you to the ladies. Make sure to visit all of their posts linked at the end too!
- Nicolle of Our Tiny Nest
- Heidi of Eleanor Rose Home
- Charity of Mornings on Macedonia
- and this month’s guest: Donna of An Organized Season

If you are popping over from Charity of Mornings on Macedonia and her post on dinnerware that’s perfect for a patriotic tablescape, welcome! Wasn’t that just beautiful ?
How to Mod Podge Sea Shells for Decor
With just a few simple steps, some Mod Podge Gloss, and patriotic napkins, you can transform ordinary sea shells into stunning decor pieces with a touch of patriotism. Mod podge crafts provide endless opportunities for creativity, and these decorated sea shells are a fantastic way to add a unique and personal touch to your home.
Whether you’re celebrating Independence Day, Memorial Day, or simply want to infuse your space with a patriotic theme, these mod podge sea shells are sure to impress. Display them proudly, give them as gifts, or incorporate them into various crafts—the possibilities are endless!
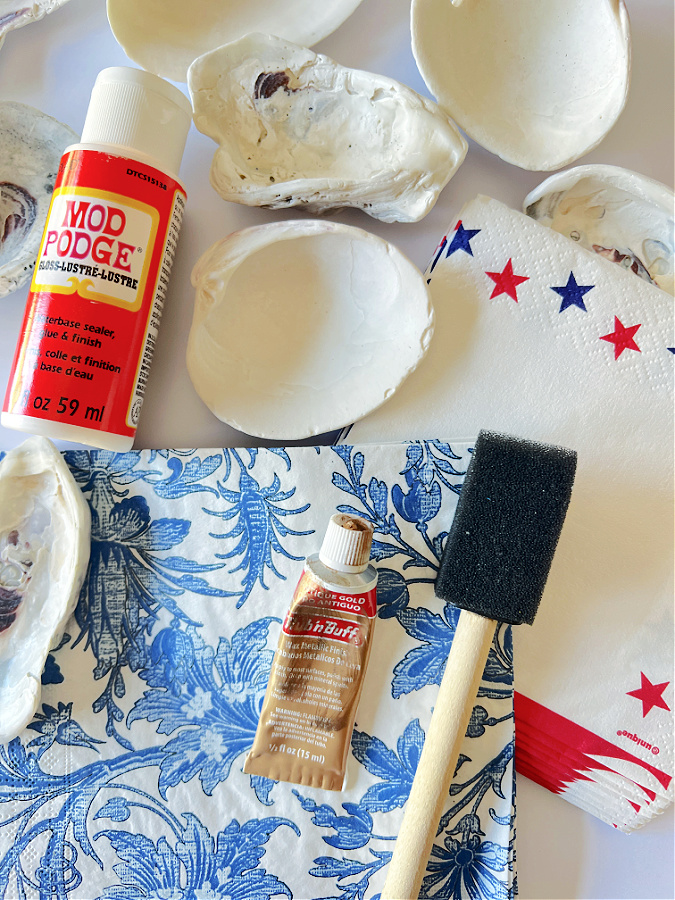
Materials Needed:
- Sea shells (collected from your favorite beach trip!) or HERE
- Mod Podge Gloss
- Paintbrush or foam brush
- Patriotic napkins or tissue paper
- Scissors
- Craft paper or newspaper
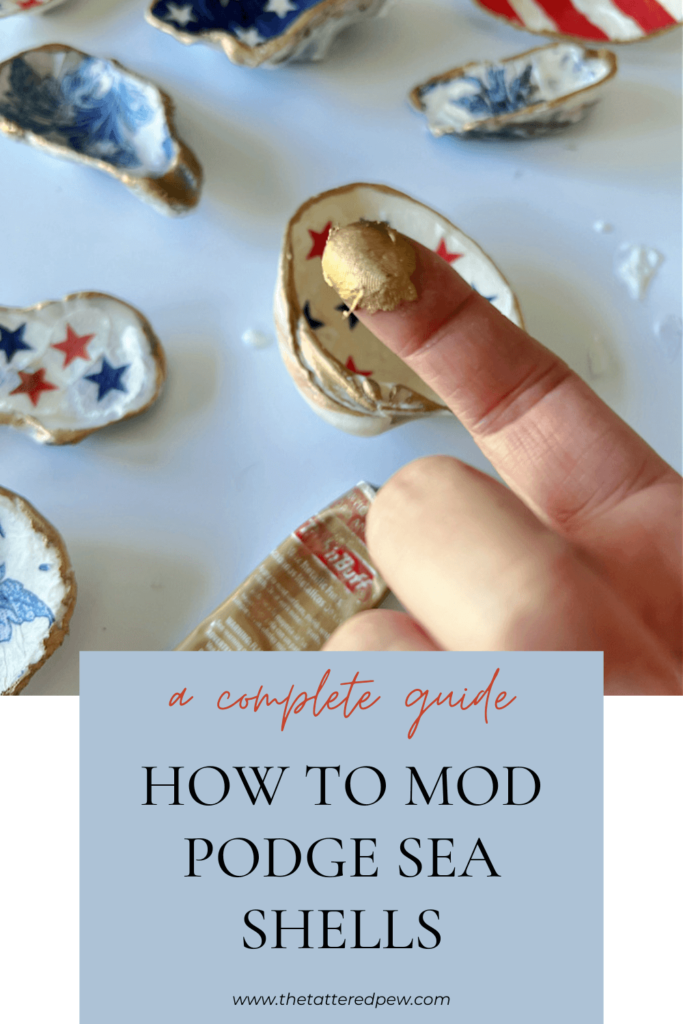
- Optional: Antique Gold Rub-N-Buff
Step-by-Step Guide:
Let me walk you through this 15 minute simple DIY!
Step 1: Prep Your Workspace
Lay down craft paper or newspaper to protect your work surface. This will make cleanup a breeze!
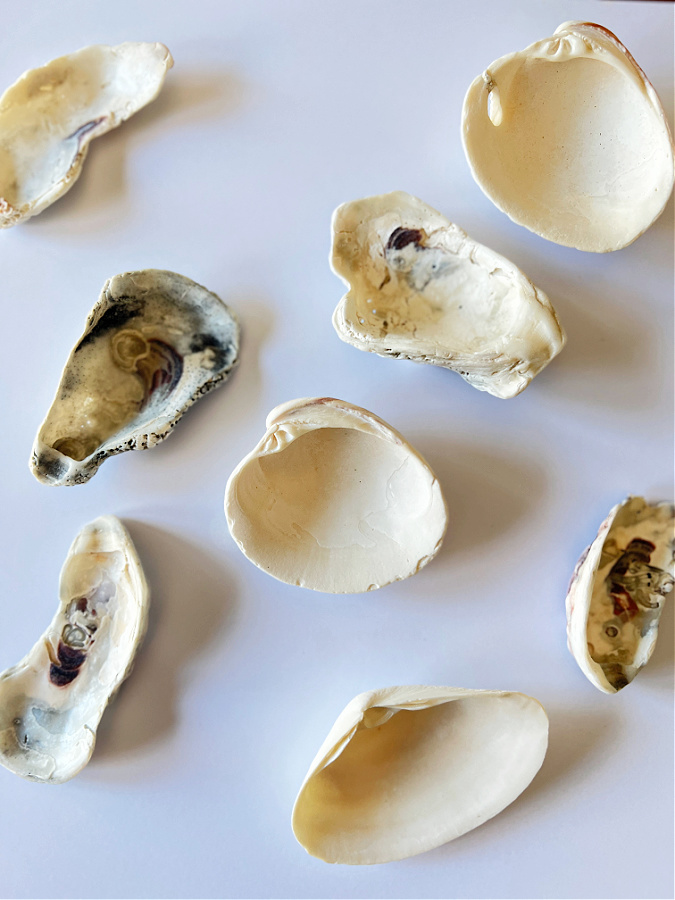
Step 2: Gather Your Sea Shells
Head to your stash of sea shells or take a trip to the beach to collect shells . Look for unique shapes and sizes to add variety to your decor. I used the shells we found last summer on our trip to Florida!
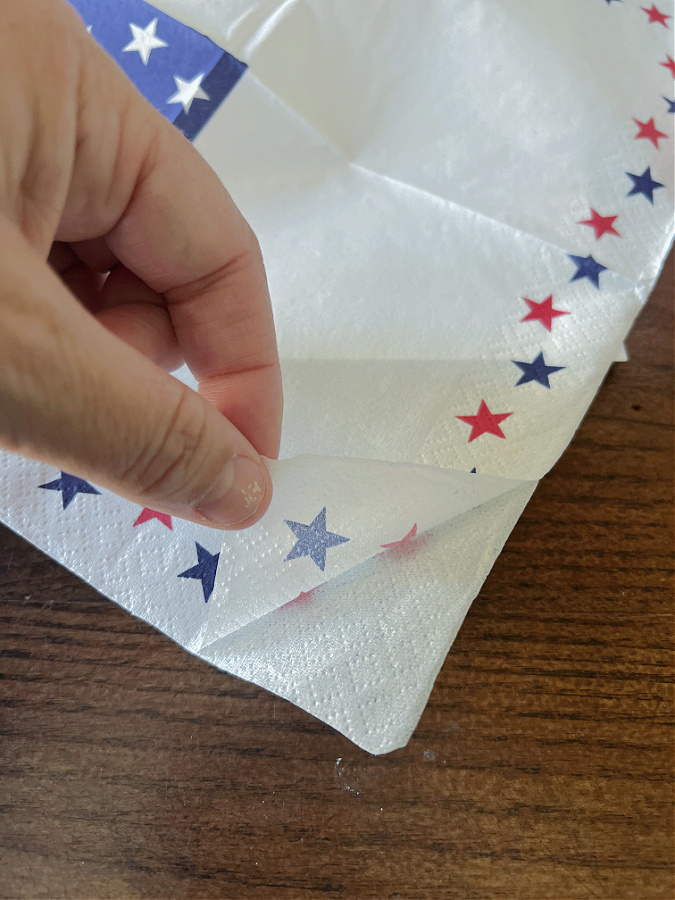
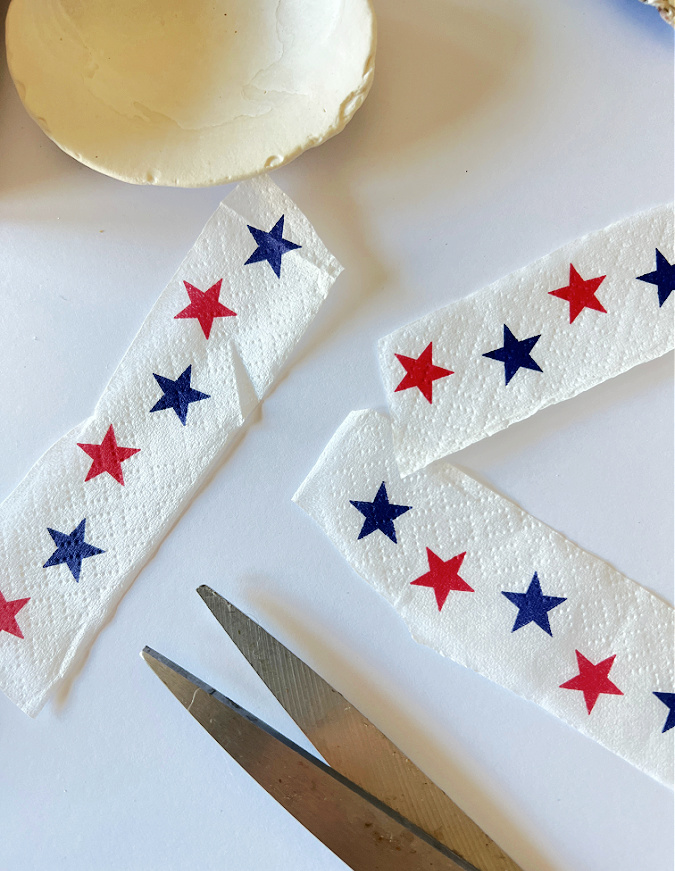
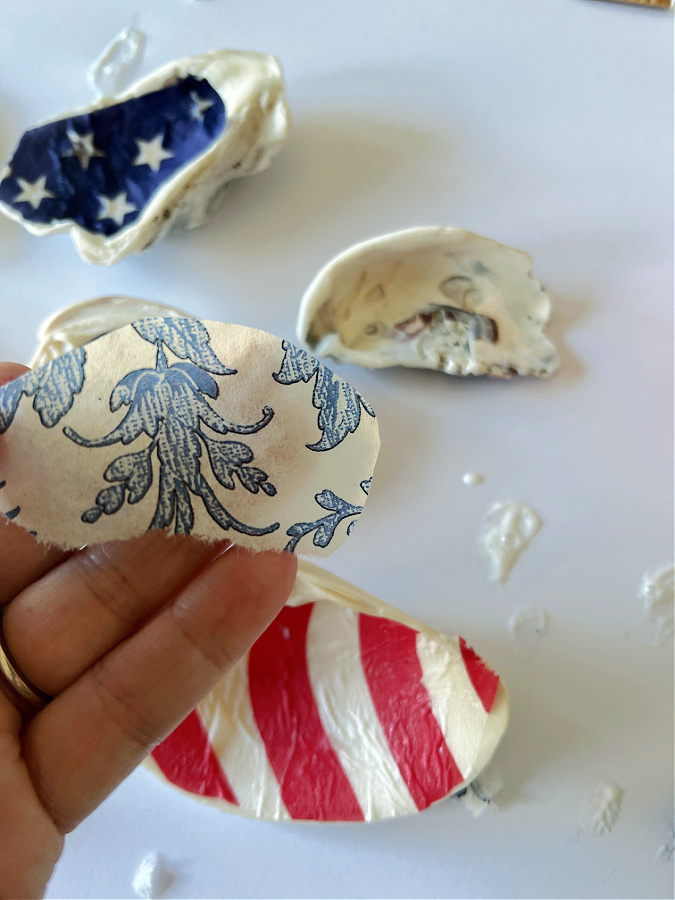
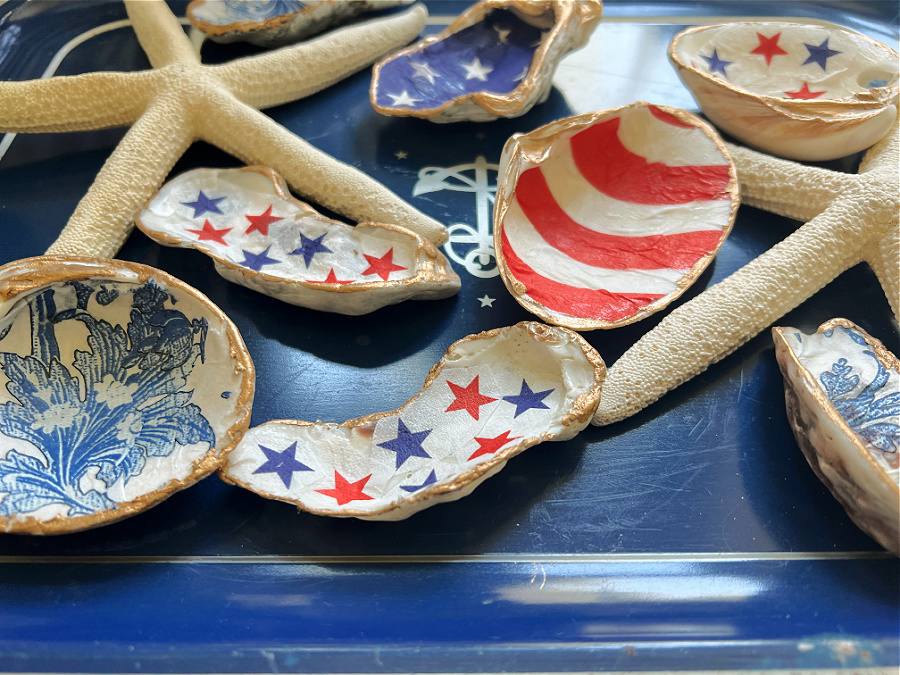
Step 3: Prepare the Patriotic Napkins
Choose patriotic napkins or tissue paper with designs that resonate with your theme. Cut out the desired patterns and separate the top printed layer from the plain white layers. I was lucky and had several patriotic napkins along with blue and white floral ones from when I mod podged them on to a cutting board!
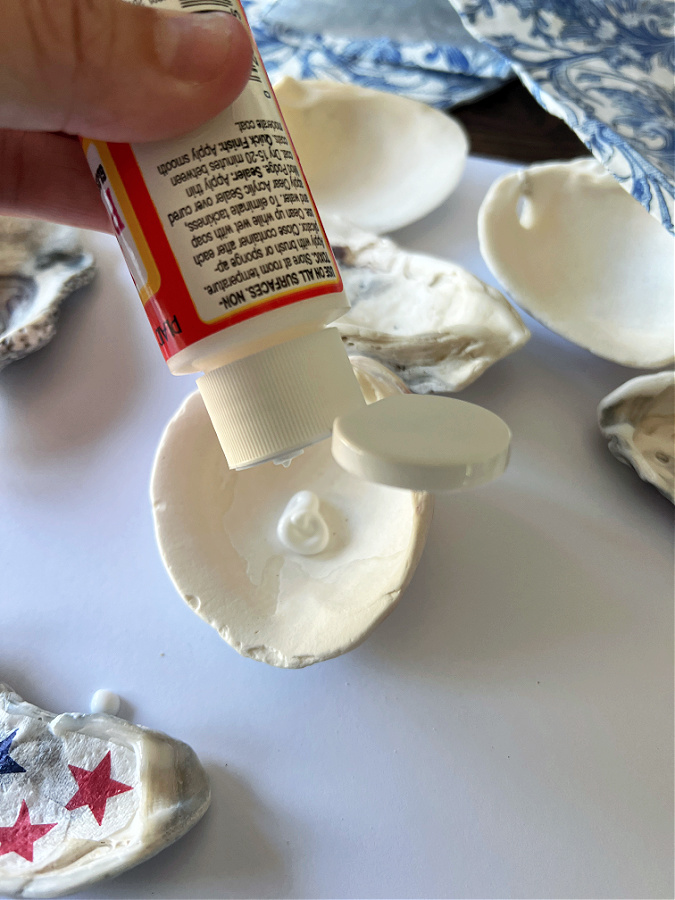
Step 4: Apply Mod Podge
Using a paintbrush or foam brush, apply a thin, even layer of Mod Podge Gloss to the inside of the shell. I ended up using my finger to spread it into some of the areas of the shell that were hard to get to. I found it easier to use my finger more than the brush!
Step 5: Place the Napkin onto the Sea Shell
Carefully place the napkin or pieces onto the inside of the sea shell, pressing it down gently with your finger or the tips of your scissors. Do your best to smooth out any wrinkles or bubbles with your fingers, ensuring the napkin adheres well to the shell’s surface. I found that it helped to cut the napkins pieces to approximate sizes of the shells.
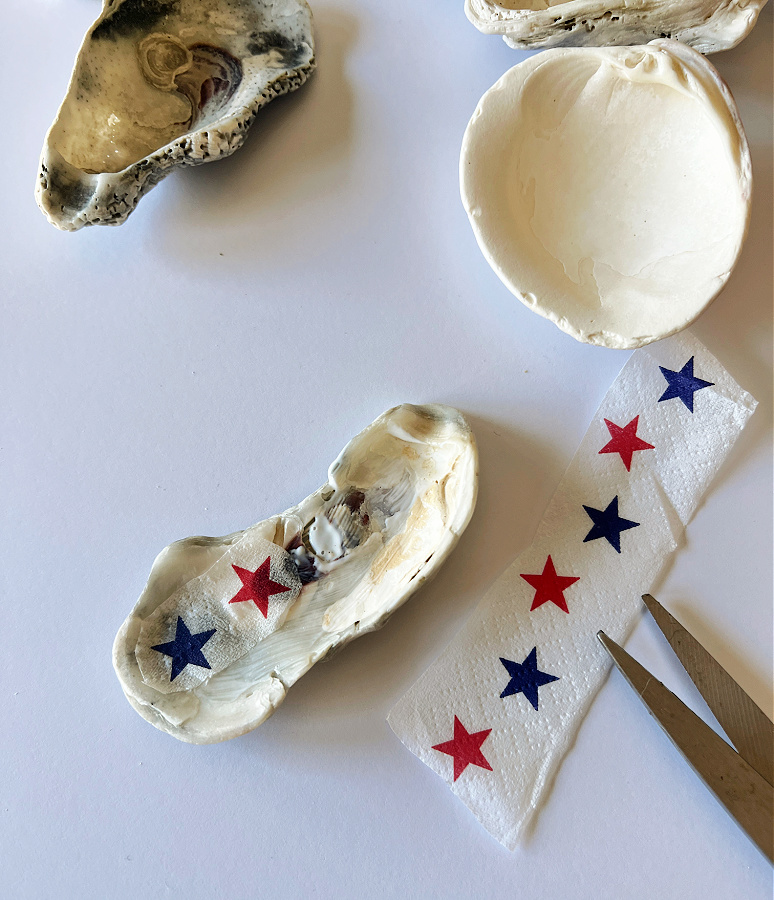
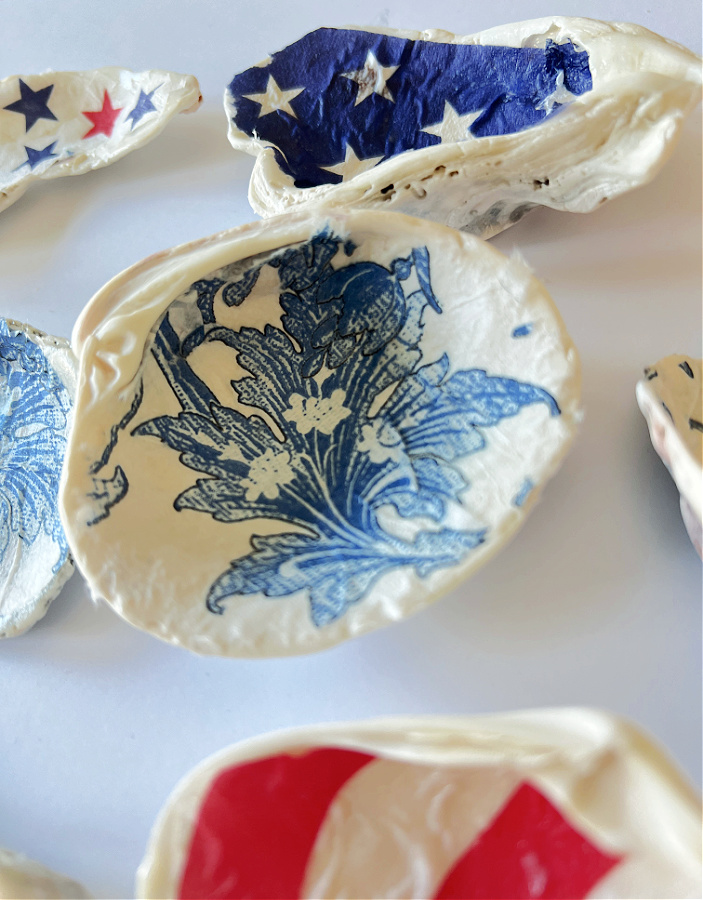
Step 6: Trim the Excess Napkin
Once the napkin is secure, trim any excess paper around the edges of the sea shell. Some of the sea shells had rough edges so it was easier to pull or tear off the excess. Just make sure it has had some time to try. This step helps create a neat and polished look for your decorated sea shell.
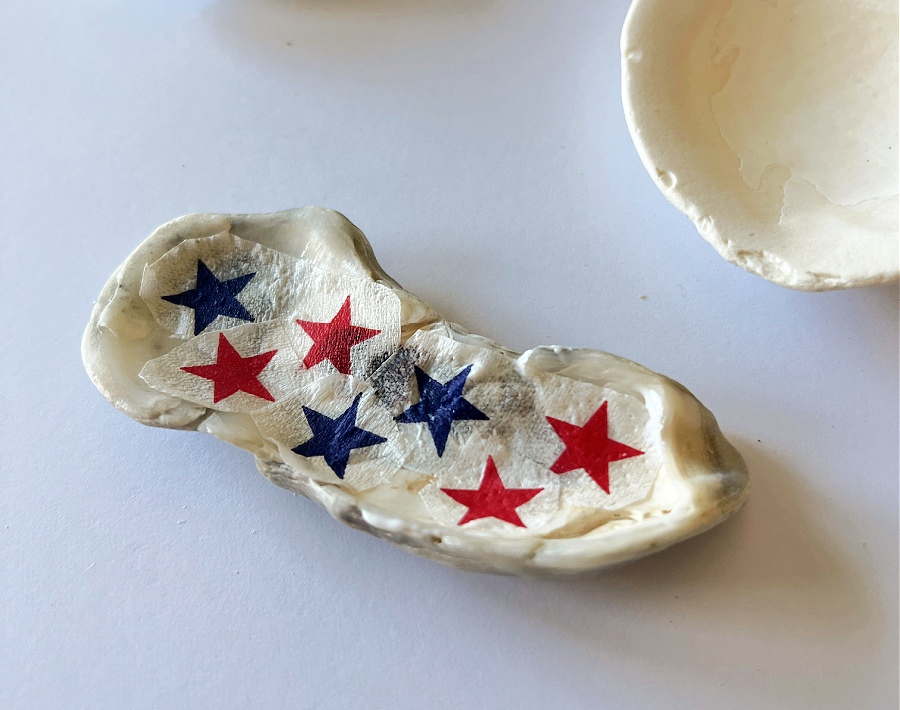
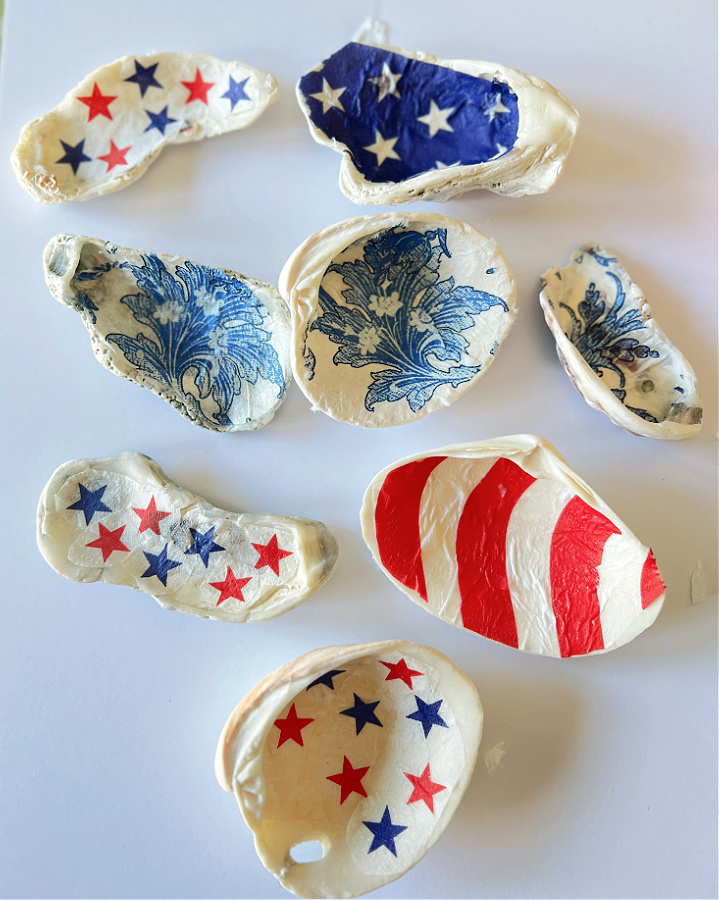
Step 7: Seal the Napkin with Mod Podge
After the napkin is trimmed, apply a thin layer of Mod Podge Gloss on top of the napkin using the paintbrush or foam brush. This will seal and protect the design, giving it a beautiful glossy finish.
Step 8: Let it Dry
Allow your decorated sea shells to dry completely. This may take a few hours, depending on the thickness of the Mod Podge. Be patient—the end result will be worth the wait!
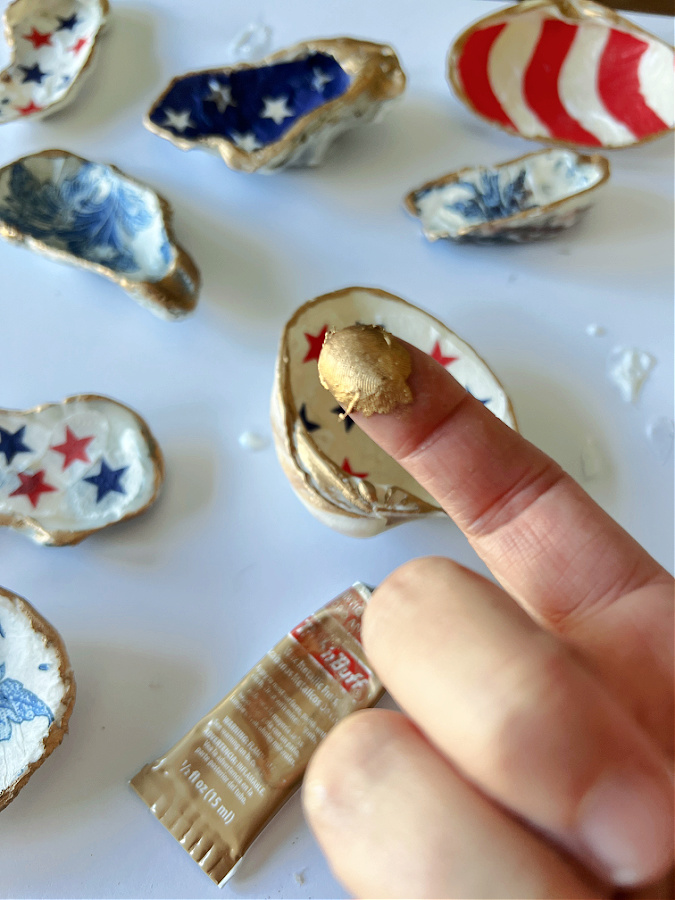
Step 9: Optional: Add Gold Details
If you’d like to enhance the look of your sea shells and give them more of a classy or elegant look you can use rub-n-buff in the color antique gold. Simply put a small amount on your fingertip and go around the edge of the shell. Remember, a little goes a long way!
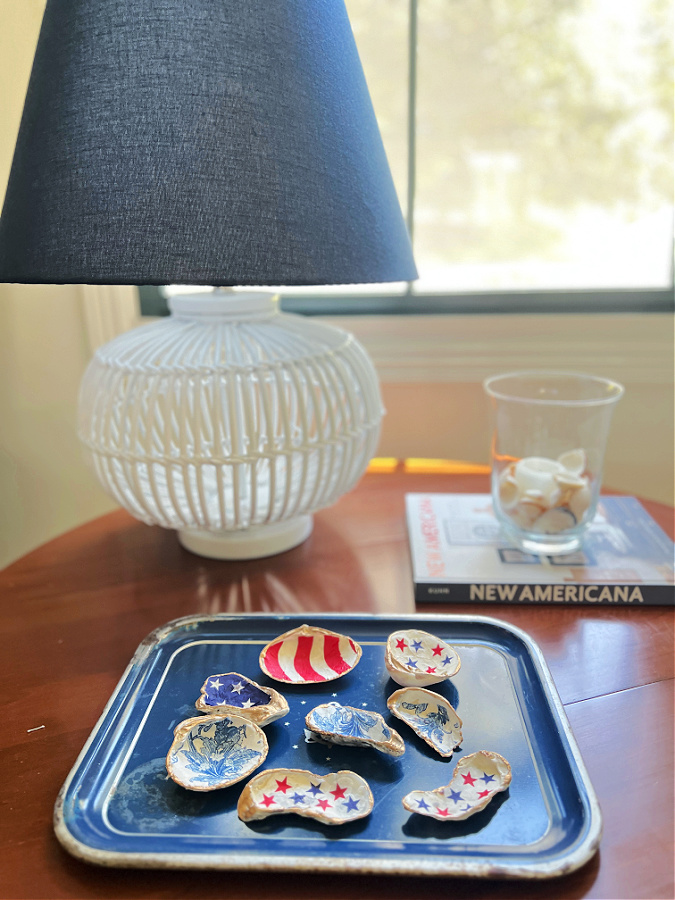
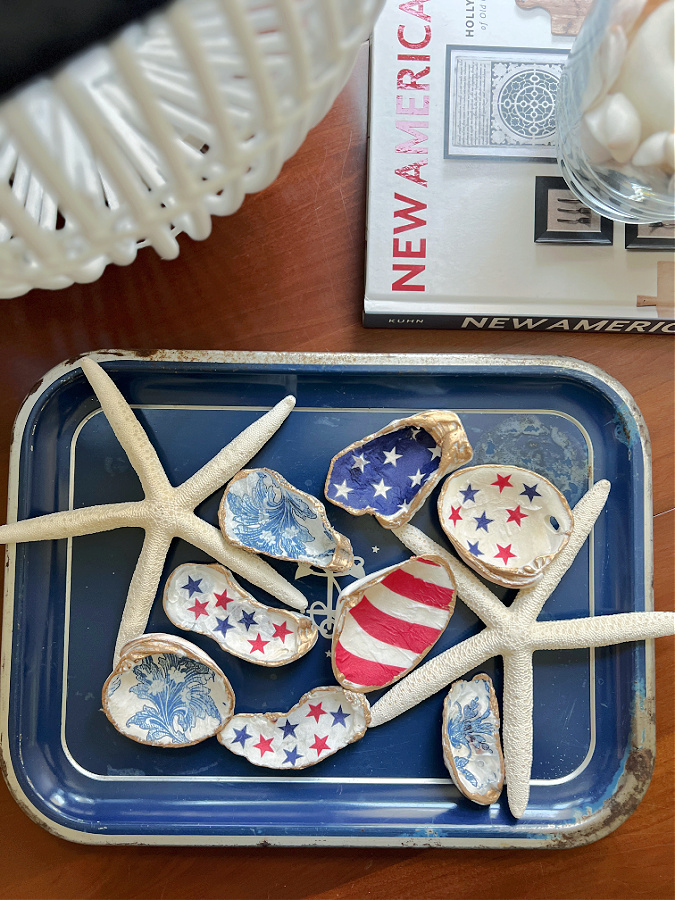
Step 10: Display and Enjoy!
Once your sea shells are dry, it’s time to showcase your patriotic creations. Arrange them in a decorative bowl, use them as table centerpieces, or incorporate them into a coastal-themed vignette. These mod podge sea shells will undoubtedly spark conversations and add a unique touch to any space.
Plus, I know every time I see them they will remind me of our family trip to Florida!
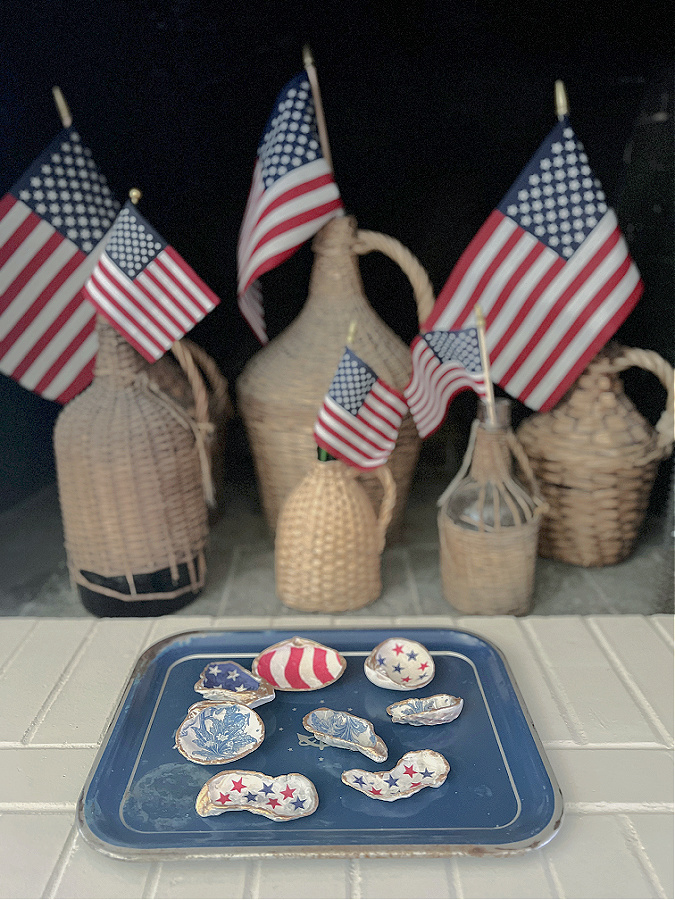
Uses for Mod Podge Sea Shells
- Home Decor: Place your mod podge sea shells on shelves, mantels, or tabletops for an eye-catching display that celebrates your patriotic spirit.
- Party Decorations: Spruce up your Independence Day or Memorial Day gatherings by incorporating these decorated sea shells into your table settings or party decor. (Maybe name cards?)
- Gift Embellishments: Attach a mod podge sea shell to a wrapped gift or use it as a decorative topper for a jar filled with homemade goodies. It adds a special touch and makes the recipient feel extra special.
- Coastal-Themed Crafts: If you have a coastal or nautical-themed room, these mod podge sea shells are the perfect addition. Create wreaths, garlands, or mobiles using your decorated sea shells for a charming coastal vibe.
- Memory Keepsakes: Preserve the memories of a beach vacation by using mod podge sea shells as keepsakes. Display them in shadow boxes or create a memory jar filled with sand and small seashells, reminding you of sunny days spent by the ocean.
- Wall Art: Arrange your mod podge sea shells on a canvas or a wooden plaque to create unique and personalized wall art. You can even add inspiring quotes or patriotic phrases using letter stickers or stencils.
- Use them On a Wreath: Use your shells to embellish a wreath or use the shells themselves to create the wreath!
Frequently Asked Questions About Mod Podge Gloss
- What is Mod Podge Gloss?
- Mod Podge Gloss is a versatile decoupage medium that acts as both an adhesive and a sealant. It is used for various crafts and projects to create a glossy finish.
- Can I use Mod Podge Gloss on different surfaces?
- Yes, Mod Podge Gloss can be used on a variety of surfaces, including wood, paper, fabric, glass, and more. It adheres well to most porous and non-porous materials.
- How do I apply Mod Podge Gloss?
- Apply Mod Podge Gloss with a paintbrush or foam brush, using long, even strokes. Start with a thin layer and add more coats as needed. Allow each layer to dry completely before applying the next.
- How long does Mod Podge Gloss take to dry?
- The drying time for Mod Podge Gloss can vary depending on the thickness of the application and environmental factors. In general, it takes about 15-20 minutes for each layer to dry to the touch and 24 hours for it to cure completely.
- Can I speed up the drying process?
- Yes, you can speed up the drying process by placing your project in a well-ventilated area or using a fan to circulate air. However, avoid using excessive heat, as it can cause the Mod Podge to bubble or crack.
- Can I use Mod Podge Gloss as a topcoat?
- Absolutely! Mod Podge Gloss is often used as a topcoat to seal and protect your projects. It provides a shiny, durable finish that enhances the colors and adds a professional touch.
- Can I clean Mod Podge Gloss from brushes?
- Yes, clean your brushes immediately after using Mod Podge Gloss by rinsing them with warm water and mild soap. Work the soap into the bristles to remove any residue. Rinse thoroughly and let them air dry.
- Can I remove or fix mistakes made with Mod Podge Gloss?
- While Mod Podge Gloss dries clear, it can be challenging to remove or fix mistakes once it has dried. It’s best to work carefully and plan ahead to avoid errors. However, if necessary, you can lightly sand the surface or use a damp cloth to try and remove excess Mod Podge.
- Is Mod Podge Gloss waterproof?
- Mod Podge Gloss is not fully waterproof. While it provides some water resistance, prolonged exposure to water can cause it to soften or lose its adhesion. If you require a waterproof finish, consider using a waterproof sealer in addition to Mod Podge.
- Can I use Mod Podge Gloss for outdoor projects?
- Mod Podge Gloss is not recommended for long-term outdoor use as it may not withstand harsh weather conditions. However, you can use it on projects that will be placed in covered or protected outdoor areas.
How to Mod Podge Sea Shells for Decor
Remember, experimenting and practicing with Mod Podge Gloss will help you gain confidence and discover new techniques for your craft projects. Enjoy the creative journey and have fun exploring the possibilities of this fantastic decoupage medium!
So, grab your sea shells, gather your crafting supplies, and let your creativity soar as youtry this mod podge project. Get ready to infuse your home with a sense of pride and a touch of the sea with these beautiful decorated sea shells. Happy crafting, my friends!
More Patriotic Ideas With the Cozy Creative Collaborative
Now make sure to hop over to Donna from An Organized Season as she is sharing some great last minute simple patriotic ideas for the 4th of July!
Then scroll down to see the other patriotic ideas and recipes my friends are sharing as well.

Fireworks Ice Cream Brownie Sundae | Nicolle of Our Tiny Nest Blog

Dinnerware That’s Perfect for a Patriotic Tablescape | Charity of Mornings on Macedonia

Star Shaped 4th of July Rice Krispie Treat Recipe | Heidi of Eleanor Rose Home

Last Minute Simple Patriotic Ideas for the 4th of July | Donna of An Organized Season
I’d love to have you hang out with me some more! Feel free to follow along with me on any of the platforms linked below.
LTK | Facebook | Instagram | Pinterest | Amazon
xoxo,
Kelly
Did you like this post? PIN it for later!

Kelly these came out so cute!!! I have been on a coastal sea shell decor kick! I would never have thought to modge podge shells, this is a fantastic idea!!!
Aww thanks Nicolle! Me too! I love all things sea shells and coastal!
Hi Kelly! This is such a creative idea! Your seashells look amazing! I love how you added the gold accents to the edges! Now I can’t wait to go back to the beach and look for shells! Hope you and yours have a fun and festive 4th of July!
Thank you Donna and thank you for joining us this month!
These are adorable. I love Rub N Buff!
Thank you Cindy, me too!
Kelly, You have inspired me to try this adorable craft! What a great idea!!! I love that you can change the napkin for any season, and the gold detail with the Rub n’ Buff is awesome. Happy 4th of July!
Thank you Heidi! I’m so glad you like them!
I salute you 😜 🇺🇸
Such a fun and way diy.
Ha ha! Thank you mom!
Super cute idea. I’m have shells waiting for this project. I can’t wait. HUgs to you.
Thanks Renae! Have fun!
What a lovely idea, I do like
Thank you!!!
Kelli! Looovve this patriotic idea! I want to make some with seashells that are very special to me, from a family vaca!!
Thank you!
Happy 4th!!!
Rosa
Yay this makes me SO happy! Have fun !!!
These are so good, Kelly! I love working with Modge Podge. I think it is such a relaxing medium to use! Thanks for sharing! Have a great day! 💚
I agree it can be so soothing!
Hi Kelly!
I love this project! Can’t wait to do it with
My GRANDAUGHTER! she is 12 and loves
To create treasures…
Have a wonderful 4th of July!
🇺🇸🇺🇸🇺🇸🇺🇸🇺🇸🇺🇸🇺🇸
Oh I am so glad, Melinda! Have fun with your granddaughter!